In this lesson we're looking at ROOK ENDINGS.

Rook endings occur more often than any other sort of ending.

There's a lot you need to know about them, so, if you're ready, step inside.

The first thing you need to know is that QUEEN AGAINST ROOK is a win - but it's often very hard to prove it.

Here's a typical example, with Black to move.

Wherever he moves his Rook, White will be able to play a series of checks ending up with a QUEEN FORK.

For example:
1...Rb7-b1
2.Qa5-d8+ Kb8-a7
3.Qd8-d4+ Ka7-a8
4.Qd4-h8+ Ka8-a7
5.Qh8-h7+

Now, a quick look at what happens with Rook against Pawn.

Sometimes the Rook can stop the Pawn and win, sometimes it's a draw.

It all depends where the Kings are and how far advanced the pawn is.

These positions are not always easy to play - they need a bit of thought and a bit of calculation to get them right.

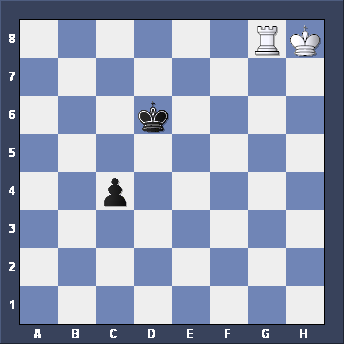
Take this position, for instance.

Although the White King is stuck in the corner he can still win by cutting off the enemy King. Given that clue, can you find the winning move?


Yes, White can cut off the Black King with Rg8-g5.

Now if Black pushes his pawn - c4-c3 - Black continues with Rg5-g3 and Rg3-c3, winning the Pawn.

The idea of using the Rook to cut off the enemy King is very important in King and Rook endings.

Many players make the mistake of using their Rook to CHECK the enemy King - which just drives him up the board where he wants to go.

Next IMPORTANT FACT ABOUT ROOKS AND PAWNS:

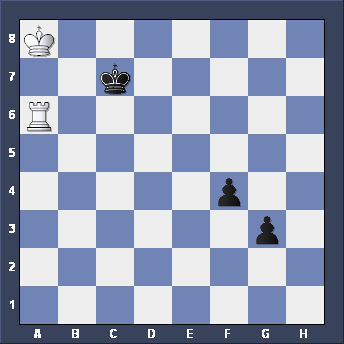
In the absence of Kings, two connected pawns on the 6th rank will beat a Rook.

Take this position, for example.

If it's Black's move he can win by pushing either pawn - the best White can hope for is a position with Rook against Queen.

Check this out for yourself before moving on.

So in this position, if it's Black's move he wins.

But if it's White's move he can win. Can you see how he does it?


Yes, the only move to win is Ra6-g6.

(Ra6-a7+ would only draw - it would bring the Black King one square nearer the pawns - remember what I said about useless rook checks.)

All other moves lose.

Notice how the White Rook stops BOTH Black Pawns from advancing.

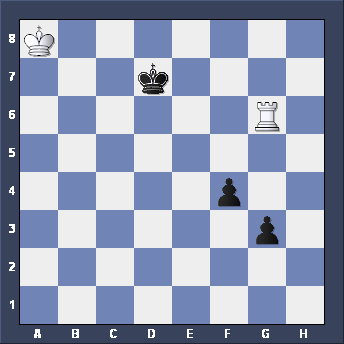
So Black has nothing better than to move his King to d7, reaching this position.

Again, White must act quickly, before the Black King gets near enough for him to draw. How can he win a pawn here?


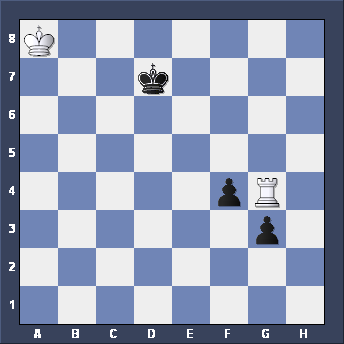
Here's the position after the winning move: Rg6-g4.

White will now win a pawn and the game.

For example, if Black plays g3-g2 we continue Rg4xg2 Kd7-e6 Rg2-g5, CUTTING OFF THE KING.

We're now going to move onto the most important part of the lesson.

We're going to consider some positions with ROOK AND PAWN AGAINST ROOK.

If you have ROOK AND PAWN against ROOK and you want to win you should ask LUCY!!

And if you want to draw with ROOK against ROOK AND PAWN you have to consult PHIL!!

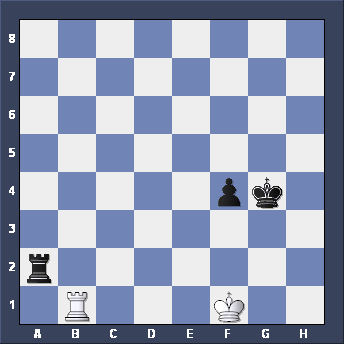
Having said that, what are you going to play for White here?


Yes, the easiest way to draw is to play Rb1-b3.

Again, notice the idea of using your Rook to stop your opponent's King advancing.

Now the only way for White to make progress is to push his Pawn, which leads to the next question.

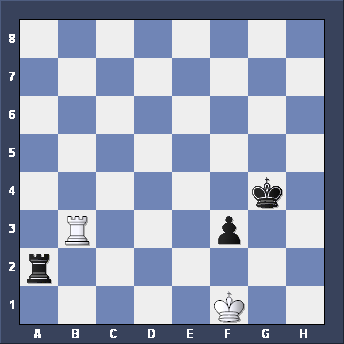
OK, it's White's move. This time you've got a choice. Which of these do you prefer?

Rb4-b1 Rb4-b3

Rb4-b8 Kf1-g1


Rb3-b1 and Kf1-g1 are both passive - Black can win most easily by Ra2-h2.

Rb3-b4+ is another useless check - Black plays Kg4-g3, forcing White's Rook back to b1, when again Ra2-h2 will win. If White wants to draw he must be able to check Black from behind, so, of your four choices, Rb3-b8 is the only move to draw.

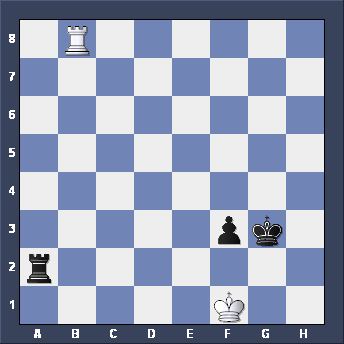
So White plays Rb3-b8 and Black moves his King up to threaten mate - Kg4-g3.

What next for White?


Yes, the only move to draw is Rb8-g8+ - this time a useful check!

You see what's going to happen, don't you?

White keeps on checking Black from behind. If the Black King every approaches the Rook White just moves the Rook back to the f-file and wins the f-pawn.

This example, the PHILIDOR position, is REALLY IMPORTANT. All serious chess players MUST know it.

If you're defending the ending with Rook against Rook and Pawn this is what you try to do:

1. Move your King to the QUEENING SQUARE.

2. Keep your Rook on your 3rd RANK to keep the enemy King out.

3. When your opponent's pawn reaches its 6th RANK (your 3rd RANK) move your Rook to the back of the board.

4. Then, when his King moves to his 6th RANK keep on CHECKING from behind.

Another important word of advice.

It's almost always correct to use your Rook ACTIVELY in ROOK AND PAWN ENDINGS.

Get your Rook up the board into your opponent's position to attack his Pawns and, if his King advances up the board, to check him from behind.

Well, we've seen how PHIL can help us draw when we've got Rook against Rook and Pawn.

Now let's see how LUCY can help us win with Rook and Pawn against Rook.

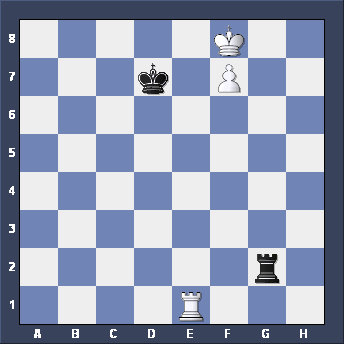
This is known (mistakenly) as the LUCENA POSITION.

(Someone called Lucena wrote a chess book in 1497 which didn't include this position. It first appeared in a book written by Salvio in 1643. So it should really be called the Salvio position - and you should consult Sal rather than Lucy!)

You will see that this time White has moved his King to the Queening square. There are several ways to win this position, but the one discovered by Salvio is the easiest and best one to learn.

It's also called BUILDING A BRIDGE - you'll see why in a minute.

White needs to bring his King out again while finding a way to shelter from the Black Rook's checks.

At the moment the Black King is too close - we need to drive him away.

How do we do this?


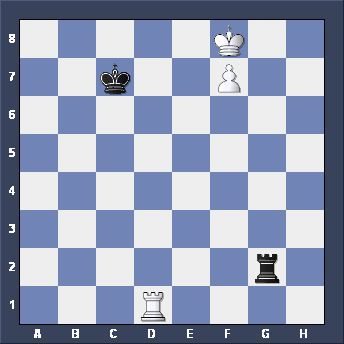
Correct! White plays Re1-d1+ (a useful check because it drives Black further away from the pawn) and let's say Black goes Kd7-c7 (Kd7-e6 allows Kf8-e8 when Black has no good checks).

This is where we BUILD A BRIDGE.

We need to find a move which will enable the Rook to block a check while the White King still defends the Pawn, and, at the same time is far enough away from the Black King.

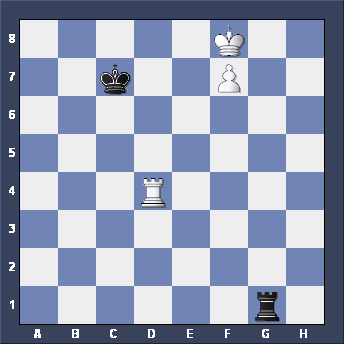
To do this we are going to move the Rook to the 4th RANK. DON'T FORGET!

So tell me, what is White's next move here?


Fine! White plays Rd1-d4 and Black plays a WAITING MOVE: Rg2-g1.

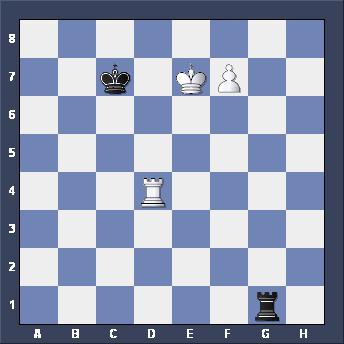
It's now time for your King to emerge and find shelter from the Black checks. Go ahead and play the move.


Yes, the King emerges via e7. Now White's threatening to Queen so Black has to check.

You might like to play these moves out on your board.

...Rg1-e1+
Ke7-f6 Re1-f1+
Kf6-e6 Rf1-e1+
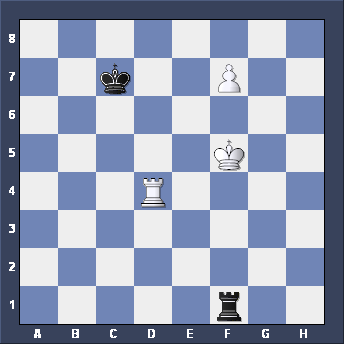
Ke6-f5 Re1-f1+

Here's the position. How are you going to get out of check this time?


Now you see the idea, don't you?

The Rook helps the White King avoid the checks.

There's now no way Black can prevent White getting a Queen.

Again, this position is VERY IMPORTANT. Make sure you KNOW, REMEMBER and UNDERSTAND it.

The PHILIDOR and LUCENA positions are the basis of understanding most endings with Rook and Pawn against Rook.

You will see from these positions that the player who gets his King to the Queening square usually gets the result he wants.

There's one other position with King and Rook against King which is well worth learning off by heart.

Let's have a look.

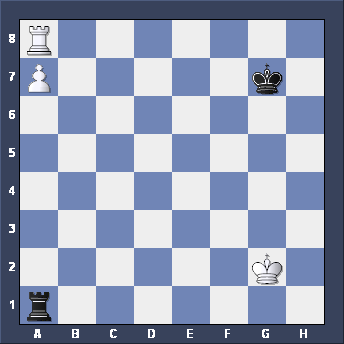
In this position it's BLACK's move - which of these moves is best?

Kg7-f7 Kg8-f6

Kg7-g6 Kg7-h7


In this position Black can draw by playing Kg7-h7 (or by moving his Rook up the a-file).

If he plays his King to f6 or g6 (or h6) White can win by checking with his Rook, then queening his pawn.

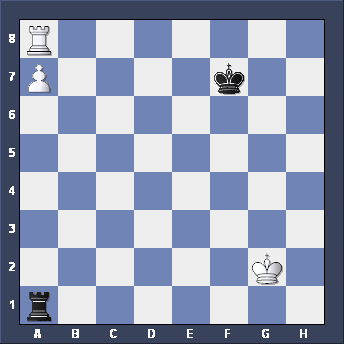
But do you see what's wrong with moving the King to f7?

Here's the position after the Black King moves to f7.

Select your move for White.


The winning move is Ra8-h8.

You see why, don't you?

If Black takes the pawn White wins the Black Rook with a SKEWER - Rh8-h7+.

To draw this sort of position Black has to keep his King on either g7 or h7 - nowhere else will do.

Another piece of essential endgame knowledge for you!

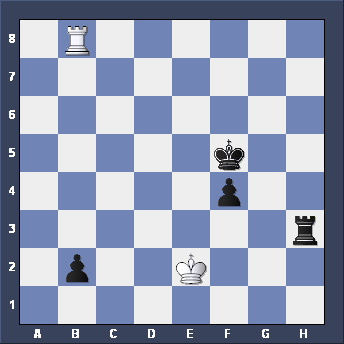
Bearing that in mind, what should White play here?

Be careful!!


Don't think I've gone mad when I tell you the answer is Rb8xb2!

Yes, White is walking straight into a SKEWER - but there is method in his madness. What should he play now?


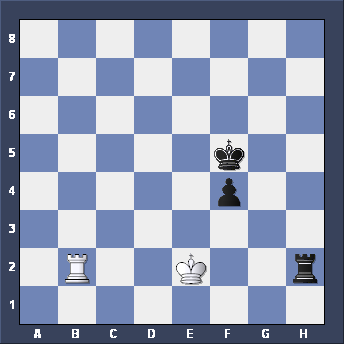
Yes, White should play Ke2-f3, reaching this position.

Now if Black takes the White Rook, guess what, it's STALEMATE!!

And if, for instance, Black plays Rh2-h4 to defend his Pawn, one way for White to draw is to offer the Rook again - Rb2-h2.

Just a little joke to finish with - but these things really do happen. This came from a game in a Grandmaster tournament played back in 1946.

A few words of advice about endings with more pawns:

1. With TWO extra pawns you should expect to win. There are two exceptions, though. Many positions with f- and h-pawns, or a- and c-pawns are drawn. Some positions with a- and h-pawns are drawn.

2. In Rook endings, 3 pawns against 2 on the same side is usually drawn. 4 pawns against 3 on the same side is often drawn. You will have more winning chances with an extra pawn if you keep pawns on BOTH sides of the board.

3. Keep your Rook active - using it from behind to attack enemy pawns. An active Rook is usually worth a pawn in Rook endings.


4. Use your Rook to keep the enemy King out of play - don't check him to force him up the board.

5. If you have a PASSED PAWN the best place for your Rook is usually BEHIND it. If your opponent has a PASSED PAWN again the best place is BEHIND it. REMEMBER: ROOKS BELONG BEHIND PASSED PAWNS (RBBPP!). 6. BEFORE you exchange off into a ROOK ENDING you must ASSESS the position - work out whether you think you are winning, drawing or losing.

7. Likewise, if you are in a Rook ending and you have the chance to offer or make a Rook exchange, you must CALCULATE what's happening in the KING AND PAWN ending BEFORE you decide whether or not to exchange Rooks.

Congratulations!!

You have now completed the ROOK ENDINGS assignment.