So far you've learned about openings starting with e2-e4.

But this is not the only good first move for White.

A move which is just as good as e2-e4 is d2-d4.

Just as good, but VERY different.If you treat QUEEN'S PAWN OPENINGS the same way as KING'S PAWN OPENINGS you really won't get very far.

Let's explain.

Suppose the game starts 1. e2-e4 e7-e5. It's easy for White to prepare d2-d4 because he's got a Queen behind the d-pawn to support it.

But after 1. d2-d4 d7-d5 it's not very easy to prepare e2-e4.

This means that in QUEEN'S PAWN OPENINGS the c-pawns play a very important role in fighting for the center.

It also means that the center of the board remains closed for longer. You don't usually get the chance for quick attacks on the enemy King that you get in KING'S PAWN OPENINGS.

So STRATEGY and POSITIONAL PLAY are more important.

So, after the moves 1. d2-d4 d7-d5 White's usual move is 2. c2-c4.

This is the QUEEN'S GAMBIT. Don't worry - you're not going to gambit your Queen, though!

If looks like a left-handed KING'S GAMBIT but it's really quite different.

White has a POSITIONAL THREAT of c4xd5, exchanging a side pawn for a center pawn and bringing Black's Queen onto an exposed square.

Black's first option is to ACCEPT the Gambit.

A good move - but Black must be aware that White can very easily build up a strong center.

He must develop his pieces fast and challenge White's PAWN CENTER by playing either c7-c5 or e7-e5 at the right moment.

White can regain the pawn at once by playing a QUEEN FORK - Qd1-a4+ - but it doesn't promise him much.

Usually White plays Ng1-f3 or e2-e4, but he has another alternative which sets a dangerous trap.

Here's the move - White plays e2-e3, which looks - and is - pretty harmless.

What Black SHOULD do here is play something like Ng8-f6 followed by e7-e6 and c7-c5 to challenge White's d-pawn.

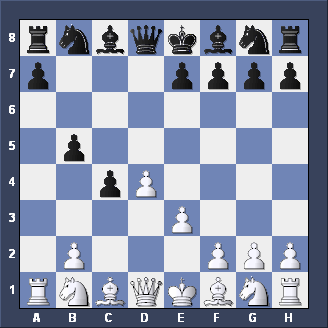
But instead he might try to be greedy and keep his extra pawn by playing b7-b5.

Now there are SOME variations of the QUEEN'S GAMBIT where you CAN try to hold onto the pawn like this.

BUT THIS IS NOT ONE OF THEM!

White can now start to undermine Black's queen side pawn structure by playing a2-a4.

Now if Black tries a7-a6 White plays a4xb5 and Black can't recapture because of the PIN on the a-file.

So instead he plays c7-c6, meeting a4xb5 with c6xb5.

(You are following this on your board, aren't you?)

Here's the position. Do you see how White can win a piece here?


Yes, the winning move is Qd1-f3, simply TRAPPING the Black ROOK in the corner.

The best Black can do now is to give up a Knight with Nb8-c6.

Tactics based on a loose Rook on the h1-a8 diagonal happen quite a lot - remember to look out for them!

There's nothing wrong with ACCEPTING the QUEEN'S GAMBIT - as long as you know what you're doing, of course.

But instead you could DEFEND the d5 pawn.

A natural looking move is Ng8-f6 - as in the diagram on your left.

WE DON'T RECOMMEND THIS MOVE, THOUGH.

The reason is that Black needs to keep a Pawn in the center of the board.

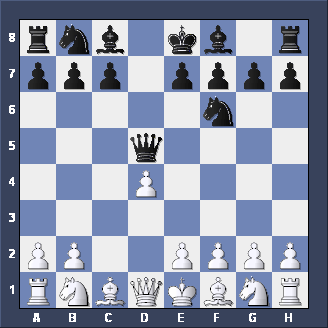
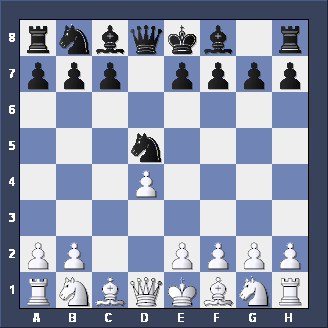
In this position White should capture the Pawn: c4xd5. Whichever way Black recaptures he will leave a piece exposed to attack.

If Black takes with the Queen, how can you drive it back?


You should be familiar with this idea by now.

White can gain time and drive back the Queen by playing Nb1-c3.

He can then follow up by playing e2-e4 with a big advantage in the center.

And if Black takes with the Knight instead, how can you drive that piece back?


Another idea you've seen before - using a pawn to drive back an enemy knight.

Another good move - preferred by some experts - is Ng1-f3.

Either way White will again gain an advantage in the center.

So if Black wants to defend his d-pawn on move 2 he does best to use a pawn.

Black's most popular 2nd move is in fact e7-e6, providing a solid defense for the d-pawn.

You can see the disadvantage of this move, can't you?

Just as in the FRENCH DEFENSE Black is blocking in his Queen's Bishop.

If Black can find active play for this piece he'll reach an equal position.

If not, White will have the advantage.

It's now time to develop some Minor Pieces - and White's most natual move is Nb1-c3, putting more pressure on the d5 pawn.

Black defends with Ng8-f6 and White adds fuel to the fire with Bc1-g5, PINNING the Black Knight. (Ng1-f3 is also very popular here.)

Now White again has a POSITIONAL THREAT.

This is to play Bg5xf6. Now if Black takes back with the Queen White can win a pawn by taking twice on d5.

And if he takes back with the pawn instead, his King side defenses have been shattered.

Black has several ways to meet the threat.

A natural move is Bf8-e7 to break the PIN.

Another good move is to support the d-pawn again with c7-c6.

(It's time to mention an important rule about defending the Queen's Gambit with Black: DON'T DEVELOP YOUR QUEEN'S KNIGHT IN FRONT OF YOUR C-PAWN. You'll need to use that pawn either to support your center with c7-c6 or to attack White's center with c7-c5.)

But instead we'll look at another option for Black - one which also sets a nasty trap.

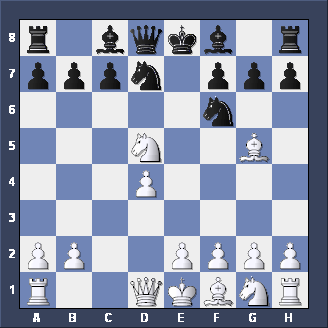
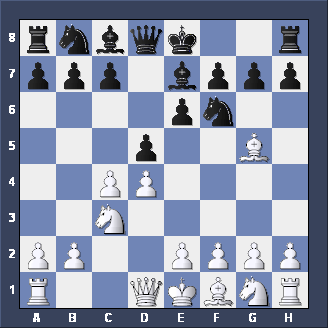
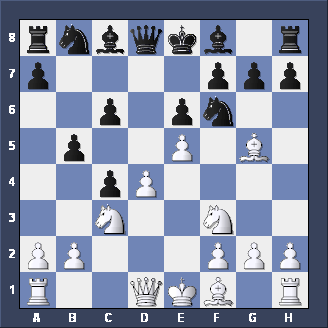
The move we have in mind is Nb8-d7 (see diagram).

This meets White's POSITIONAL THREAT of Bg5xf6 but it interferes with the Black Queen's defense of d5.

It looks like this move's a mistake, doesn't it?

White can play c4xd5 and if e6xd5 then Nc3xd5, EXPLOITING THE PIN by the Bishop on the Knight on f6.

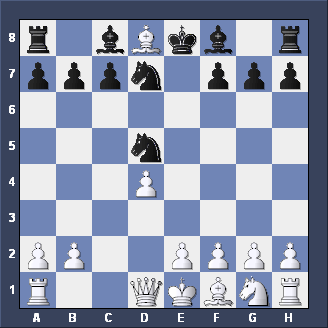
After the moves c4xd5 (which is fine) e6xd5 Nc3xd5 we reach this position.

You have to look a couple of moves ahead to work out what Black should play here.


Amazingly, Black CAN play Nf6xd5, even though it loses the Queen. Have you seen what Black can do now?


You see it now, don't you?

Black plays Bf8-b4+ and sadly for White he only has one legal move: Qd1-d2.

After Black takes the Queen on d2 and the Bishop on d8 he ends up a Knight for a Pawn ahead.

You have to see these things coming a mile off!

Either that or learn them off by heart!

But even if White avoids that trap, there are still some more in store for him.

Returning to the position after Black's 4th move, it's natural for White to play Ng1-f3, now THREATENING to take twice on d5 safely. Black defends against this THREAT by supporting his center with c7-c6 and again the obvious move for White is e2-e3.

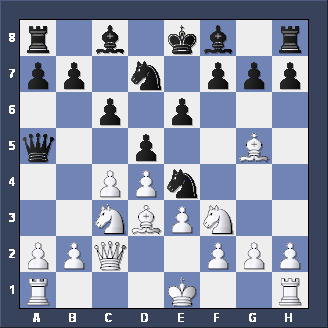
Now Black reveals the next stage of his plan by playing Qd8-a5, PINNING the Knight on c3. Black's idea is to attack the Knight atain with moves like Bf8-b4 and Nf6-e4.

This is called the CAMBRIDGE SPRINGS VARIATION, named after a town in America where a famous tournament took place in 1904.

Here's the position.

If White knows what he's doing here he's fine but it's very easy for him to fall into a trap and lose a piece here.

White's most popular move here is the rather strange looking Nf3-d2, planning to drive away the Black Queen.

Other good moves are c4xd5 and Bg5xf6.

But if White just plays developing moves he can very quickly run into trouble.

A natural (but not so good) developing move for White would be Bf1-d3.

(You're playing these moves out on your board, aren't you?)

Now Black creates a few THREATS with Nf6-e4.

Relatively best for White now is Bd3xe4 but if he meets the THREAT to c3 by playing Qd1-c2 we reach this position.

Can you tell me Black's best move in this position?


You're right (I hope) - Black should indeed play Ne4xg5, and White plays Nf3xg5. Now what?

If you want to make a pawn capture here just enter the name of the square. In real life you'd write d5xc4 or dxc4.


Of course!

In this position Black plays d5xc4 with a DOUBLE ATTACK - a DIRECT ATTACK on the Bishop on d3 and a DISCOVERED ATTACK on the Knight on g5.

One of the pieces must go.

The QUEEN'S GAMBIT is an excellent opening for White - but you need to know how to avoid traps like this!

Returning again to move 4, a quick look at Black's most popular choice, Bf8-e7.

Play might continue like this:

5. Ng1-f3 0-0
6. e2-e3 Nb8-d7
7. Ra1-c1

What's happening here is that White's waiting to see whether Black is going to play d5xc4 before moving his Bishop.

Meanwhile Black's waiting for White to move his Bishop before playing d5xc4.

Every move is important chess! Be careful about playing a pawn exchange if your opponent can recapture and play a DEVELOPING MOVE at the same time.

In this position Black usually plays c7-c6, and then White can either play Bf1-d3 or wait a little longer with something like Qd1-c2.

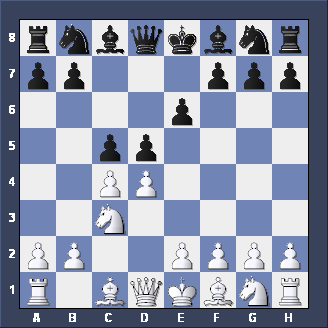
Going right the way back to move 3, another move Black could try instead of Ng8-f6 is c7-c5.

With this move Black tries to free his position at once.

The disadvantage of this move is that Black may well end up with an ISOLATED d-pawn.

It's still well worth trying out if you're Black, though.

By the way, this is the TARRASCH DEFENSE to the QUEEN'S GAMBIT - named after the same chap who gave his name to 3. Nb1-d2 in the FRENCH DEFENSE.

Here's a quick question for you.

It's White's move - which pawn capture would you prefer? Enter either d5 or c5 to indicate the pawn you want to capture.


Yes, c4xd5 is a much better move than d4xc5, which develops Black's Bishop for him.

As I said just now, beware of playing a pawn capture which will be met by a DEVELOPING move.

White should wait for Black to move his Bishop on f8 before playing d4xc5.

Now we go right the way back to move 2 and look another popular move for Black to play against the QUEEN'S GAMBIT.

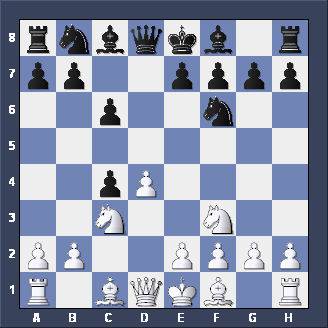
This is the SLAV DEFENSE - 2. c7-c6.

An advantage of this move is that it doesn't block in the Bishop on c8.

One idea is that sometimes Black may be able to take the pawn on c4 and then try to keep it by playing b7-b5.

Play in the SLAV DEFENSE could continue:

3. Ng1-f3 Ng8-f6
4. Nb1-c3

And now Black has to make a decision. The two most popular moves are e7-e6 to support the center again and d5xc4 to take the c-pawn and see what White does next.

Here's the position after Black captures on c4. How can White prevent Black keeping his pawn with b7-b5?


The usual move for White here is a2-a4. Such a move would be hard to find without a clue if you hadn't seen the position before.

Now White will be able to continue by advancing his e-pawn and playing Bf1xc4.

Next, we look at Black's main alternative to d5xc4: e7-e6.

In this position it's White's turn to make an important decision.

He can play safe with e2-e3, or he can play Bc1-g5, PINNING the enemy Knight and trying to get back into the variations we've already looked at.

But the slightly different move order makes a very big difference to the position. After Bc1-g5 Black can indeed play Bf8-e7 or Nb8-d7.

But he can also plunge into complications with the move d5xc4.

Here White can, as before, play a2-a4, but usually he accepts Black's challenge and occupies the center with e2-e4.

Black continues with HIS plan: b7-b5 to hang onto the pawn on c4, and White plays e4-e5, THREATENING the PINNED Knight.

Has Black overlooked something? Is he going to lose a piece?

Let's find out.

No, Black hasn't overlooked anything. He has just one way of not losing a piece here. Can you find it?


Yes, the move is h7-h6.

This is a fairly common idea in this sort of position.

Black is prepared to meet Bg5-h4 with g7-g5, so he doesn't lose a piece.

Let's just say that the resulting position is VERY interesting and VERY complicated!

Although the QUEEN'S GAMBIT starts quietly - and most variations remain fairly quiet - it can also lead to tremendous complications.

Do try it out in your own games and see what happens.

In a later lesson we'll take a quick look at what might happen if Black replies to d2-d4 with something other than d7-d5.

Congratulations!!

You have now completed the QUEEN'S GAMBIT assignment.